Winterize
Winterize detail
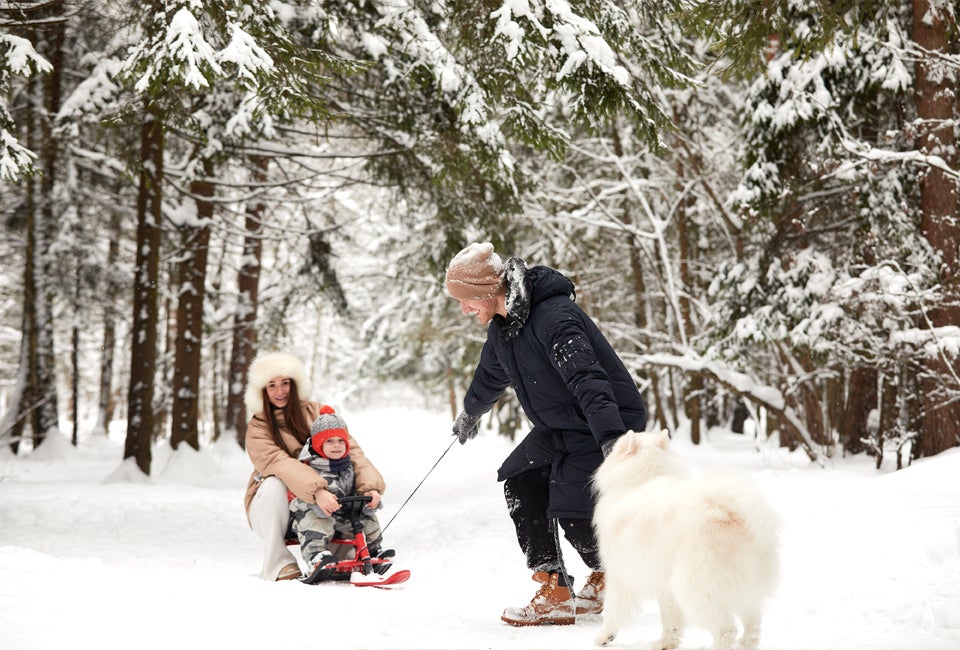
It’s a little cool out there! If you’re going to add another layer, you might want to consider doing the same with your pipes. Water pipes can freeze and burst in subzero temperatures. If this happens, your water supply will be shut off, so it’s very important that you take care of your home this winter by insulating your pipes.
Have a Leak?
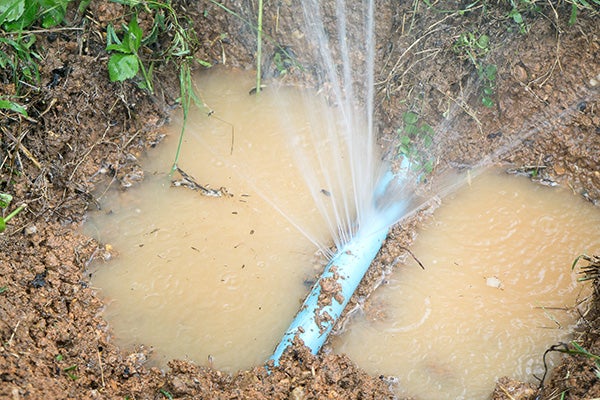
If your bill is unusually high due to a leak, we want to know about it. Contact us and we’ll help.
Tips to Prepare for Winter
It’s simple to do, doesn’t cost much, and won’t take long. Read our top tips to see how easy it is to protect your home from the cold. Let’s keep the hot brews pouring, the warm baths flowing, and the heat on!
In unheated areas, look for pipes, taps, tanks, and water meters that may be exposed to the cold. When you’ve found them, cut a piece of pipe insulation to size and clip it to the pipe. Cable ties can make this job super easy, zip a few on to the insulation to keep it secure. To keep your outside taps from freezing, use a tap cover.
Heating a home is pricy, but so are burst pipes.
If possible, keep your heating at a low temperature all the time to prevent your pipes from freezing. If severe weather is in the forecast, turn the heat up during the day and night.
If your pipes freeze and burst, the first thing you’ll need to do is turn off the main water supply. It’s a good idea to double-check the location of your shut-off valve so you’re ready if the worst happens. They’re usually located under the kitchen sink.
Looking for leaks; we’re investing in new technologies to help us find leaks faster, and our committed team is working hard to keep our pipe network running smoothly and prevent water supply disruptions.
Underground pipes are more likely to leak or burst throughout the winter because sub-zero temperatures cause them to constrict and defrost, so they’re extra busy!
- Protect your home’s plumbing
- Winterize your outdoor faucets
- Thawing frozen Pipes
- snowmelt Flooding
- Preventing
Snowmelt flooding
Each year winter comes along and tries its best to destroy water pipes. Ruptured water lines can cause serious damage to your home such as water-soaked walls, ceilings, and floors, all of which require costly repairs.
Here are some tips to put into practice when freezing weather, snow and ice hit your area.
Protect Water Lines
To keep outdoor plumbing fixtures from freezing, start by disconnecting and storing any garden hoses. Then shut off the water to all outdoor faucets followed by draining the corresponding lines. Lastly, insulate all hose bibs.
Check for Holes and Cracks
Even the tiniest of holes within your home can be an entry point for freezing air. Quickly remedy this by purchasing a tube of foam insulation and filling them. Cracks around entryway doors can also be an entry point for freezing air. Use weather stripping to easily solve this issue.
Add Insulation
Protect your pipes from freezing by making sure that your home is properly insulated. In many cases, this can be as simple as insulating the pipes themselves. However, having properly insulated exterior walls, crawl space or basement, and the attic is recommended.
Keep Water Flowing
If you have any indoor faucets that aren’t properly insulated and are located on an exterior wall, allow them to drip slowly whenever temperatures drop below freezing. By making sure that both the hot and cold lines are slightly opened, your risk of frozen lines is dramatically reduced. Also, consider leaving cabinet doors open, so your pipes will be warmed whenever your home’s heating system kicks on.
Ensure Easy Access to Water Shutoff
First, if your main water shut off valve is hard to get to, be sure to rearrange you’re your space so that it will be readily accessible in the event of a plumbing emergency. Secondly, test the shut-off valve to be sure that it is in good working order. Turning the dial all the way to the right should shut off all water to the house. Be careful as sometimes these valves can become obstructed with rust and will be locked open or only close partially. If this is the case, replace the valve immediately.
It’s also recommended that everyone in your home knows where the shut off valve is located and how to turn off the water should an emergency arise.
Close Garage Doors
If your home has an attached garage, minimize the amount of time that it remains open. This aids in keeping cold air out of your house while protecting your water heater and any other plumbing that you may have in the garage.
Note: If plumbing is present within your garage, insulating the garage door will greatly reduce the risk of frozen lines.
Go a step further, and insulate the whole garage for maximum protection.
Keep the Temperature Steady
Be sure that you are able to keep your thermostat operating continuously by keeping spare batteries on hand. Sometimes it is the smallest of details that make a world of difference.
Bonus: Wi-Fi thermostats let you control and monitor your home’s temperature using any mobile device. If your home’s temperature drops, you’ll get an email or text alert. Other types of alert systems are available as well. Some send alerts to your cell phone via a phone jack in your home while others send an alert to either a landline or cell phone. These thermostats are available at home centers for $100 – $500.
Prepare for Vacation
If you are considering your next getaway, don’t forget to turn off the water to your home and drain the plumbing system. This way, you will not have to worry about freezing pipes or other plumbing issues while you are away.
Tip: Something that often goes unnoticed is automatic icemakers. By shutting these devices off before going on vacation it helps protect against burning out its motor. Even if the bin is full, the ice will evaporate and the icemaker will try to make more.
With one very affordable update, you can avoid major headaches and expensive repair bills by winterizing outdoor water faucets (also known as hose spigots or hose bibs) around your home.
How Frost-Proof Wall Hydrants or Hose Bibs Work
- These fixtures are designed to turn off the water inside the foundation wall. This is accomplished by the mechanism being longer than the width of your foundation wall and a washer seats at the end of the hydrant or hose bib.
- Coming in a variety of lengths depending on the width of the foundation wall or point of connection inside, these fixtures drain water out when they are off.
- If properly insulated, they do not need additional insulation. However, you should always disconnect hoses before freezing weather sets in.
- During very cold winters, if where the piping connects inside is not heated or is drafty, pipes may freeze and burst when they thaw.
How Outdoor Faucet Covers Work
Many faucet covers use one of two styles. One style is made of rigid thermal foam with a flexible gasket around the edges. Style two is made of a flexible insulated bag that secures around the spigot. Either style works well and provides extra protection against a spigot bursting due to freezing.
Both of the above styles work by trapping naturally occurring heat that radiates through the pipes to the outdoor spigots. If the cover is correctly installed, the radiated heat is trapped and therefore prevents the faucet from freezing, expanding, and rupturing.
Outdoor faucet covers are marketed under many different names, including “garden faucet insulation cover” or “insulated faucet socks”. These are essentially the same thing and will do the job, but for best results, be sure that they give a tight seal so that they provide proper thermal protection.
What You’ll Need
Materials
- Insulated faucet covers (one for each outdoor spigot)
- Faucet repair materials (as needed)
Instructions
Installing outdoor faucet covers should be done at the same time as other winterizing procedures aimed at removing as much water as possible so there is minimal trapped water that can freeze inside the spigot.
01 Disconnect Hoses: Regardless of the type of outdoor spigots you have, freeze-proof or not, it is crucial that you remove any hoses or fittings screwed onto the spigot before winter. If this is not done, water can become trapped making freezing much more likely. It is best to stay ahead of the cold weather by disconnecting hoses and fittings early because just one night of freezing weather can cause pipes to burst.
02 Inspect Spigots: Next up is leak detection and repair. Check all of your spigots, yard hydrants, and other fixtures for leaks and drips. If a problem is found, repair or replace the fixture prior to freezing weather. A dripping or leaky faucet often indicates a failing washer or cartridge, which if left unchecked can block and freeze the spigot or the pipe feeding it.
03 Drain the Spigot and Corresponding Pipes: Now it’s time to remove as much water as possible from the pipes. If you have an outdoor spigot that is not freeze-proof, the best way to do this is by turning off the interior shut-off valve to the water line supplying the spigot, then opening the spigot and leaving it open for a couple of hours until all of the water inside the pipe drains out. After this, close the spigot. This procedure is best to do while the temperature is above freezing. If there is not an indoor shut-off valve, it is even more important to carefully insulate the spigot from the outdoors.
With frost-free spigots or yard hydrants, this step is not required due to the fixtures being designed to keep the water well away from the end of the spigot. However, just as with regular outdoor spigots, all hoses and other fittings should be disconnected before winter, or they may not drain properly.
04 Install Outdoor Faucet Covers: The final step in winterizing outdoor faucets is to protect them with insulation. The easiest way to do this is by installing a faucet cover on each outdoor spigot, including frost-free ones. These covers often come as square or dome-shaped shells that fit over the faucet, or as flexible bags made of durable fabric that is stuffed with insulation.
When covering non-freeze-proof spigots, additional loose insulation can be installed inside the cover to further insulate the spigot throughout the winter. In most scenarios, however, the cover alone will provide adequate protection.
Freeze-proof spigots should be covered too, because, though they are resistant to freezing, they are not entirely frost-proof in the harshest winters. There are rubber gaskets and washers inside these spigots that benefit from the extra insulation.
Your outdoor faucets are now protected from the winter, and it is very unlikely that these spigots or the pipes that supply them will freeze or rupture. After the freezing weather has passed, remove the faucet covers and save them for use the following winter. Typically, they can be reused for many years before replacing them
Frozen water pipes are a serious risk during very cold winter weather. When water freezes in a pipe, it expands and can exert pressure at over 2,000 pounds per square inch. This pressure is enough to rupture almost any pipe filled with water, which provides no place for the ice to expand. A ruptured pipe can be a time bomb, since initially there may be no leaking at all since the frozen water may completely block the pipe — until that is, the ice begins to thaw slightly, at which point you are on the verge of a major flood. There are many instances where homeowners try to escape a cold winter for a few weeks of vacation in a warm climate, only to return to a home that has been devastated by tens of thousands of dollars in damage from water that destroyed walls, ceilings, and floors.
A burst pipe can easily spill several hundred gallons of water per hour, and that equates to enormous damage to your home.
Pipes are most susceptible to freezing when they are located:
- In an outside wall that adjoins the outdoors
- In a cabinet under a sink (especially when located near an outside wall).
- In an unheated crawl space or basement
- Near outdoor faucets (hose bibbs) used to connect garden hoses.
- If your pipe is frozen but not yet ruptured, you must thaw it right away. There are a few thawing techniques to try, depending on where the frozen pipe is located.
Warning: Never use a blow torch or other open flame to thaw a pipe. This presents a serious fire hazard and can damage the pipe.
Locating a Frozen Water Pipe
A frozen pipe that hasn’t burst yet often reveals itself at a faucet: When you turn on the faucet in frigid weather and no water comes out, or it has slowed to a trickle, there’s probably a blockage of ice somewhere in the line. It’s time to take immediate action:
01 Shut off the water to the faucet locally or at the home’s main water shutoff valve.
02 Open the faucet that is supplied by the frozen pipe; do this even if you don’t know where the blockage is.
03 Identify the frozen pipe and locate the blockage: Follow the pipe back from the faucet to where it runs through cold areas, such as an exterior wall or unheated crawl space. Look for areas of the pipe that have frost or ice; it may also be slightly bulged or fissured.
04 How you thaw the pipe will depend on where it is located.
Thawing a Frozen Pipe Hidden Inside a Wall
When you find that the frozen—but not yet burst—pipe is behind the surface of a wall or ceiling, you’ve got a challenge on your hands. You have three options for thawing the pipe:
- Turn up the heat in the house and wait. If you suspect the pipe is inside the wall within a bathroom or kitchen sink base cabinet or vanity, make sure to open the door of the cabinet to help the heat reach the wall.
- Cut out a section of the wall or ceiling to access the frozen section of pipe, then thaw the pipe as an exposed pipe (see next step: Thawing an Exposed Frozen Pipe)
- See note #1. Use an infrared lamp to help heat the wall section in front of where you believe the pipe is frozen. Infrared lamps are better than regular heat lamps because they pass through the air without heating it and will direct more energy to warm the wall and frozen pipe. And here is less chance that the infrared lamp will dangerously overheat the wall materials.
Thawing an Exposed Frozen Pipe
If the frozen pipe is exposed, such as may be present in an unfinished basement or garage, you have several options for thawing it. Whichever remedy you use, heat the pipe moving from the faucet toward the frozen area. This allows water to flow out as the ice melts.
Hair Dryer
This is usually the easiest and safest way to thaw a pipe. If the pipe is close to the wall, place a cookie sheet behind the pipe to help radiate heat onto the backside of the pipe.
Heat Lamp
See note #1: You can use an infrared or incandescent heat lamp. As with a hairdryer, if the pipe is close to the wall, use a cookie sheet behind the pipe to help reflect heat onto the pipe.
Portable Heater
A small, powerful heater works great for warming pipes under a kitchen or vanity base cabinet. Direct the heater onto the frozen section of the pipe. It will work like a hairdryer on steroids!
Electric Pipe Heat Tape
Heat tape is a ribbon-like wrap that contains electrical heating elements. You wrap it around the pipe you want to heat and plug it into the wall. The temperature of the tape is controlled with a thermostat. Heat tape can also be used to prevent pipes from freezing in critical areas; you can leave the heat tape on the pipe and plug it in only when needed.
Preventing Frozen Pipes
There are a few things you can do to prevent the problem of freezing pipes from occurring again:
- Leave the faucet dripping slightly during the coldest tim of the day or night. The steadily moving water will keep the pipes slightly above the freezing point and prevent them from freezing. No one wants to wastewater, but it is better than dealing with burst pipes.
- Open the cabinet doors to allow the heated air from the room to reach the pipes inside the cabinet.
- Wrap the problem pipe with electrical heat tape and allow it to run when the weather is especially cold.
- Note #2: Insulate problem pipes with foam insulation wrap, especially those that run through unheated spaces. Note: Insulation merely slows the transfer of heat and will not prevent a pipe from freezing if the surrounding air is cold enough.
- Heat unheated areas with a permanent heater, just to keep the temperature above freezing, or about 40 degrees F. Warning: Do not use portable heaters, which should never be left running unattended.
- Remove garden hoses attached to outdoor faucets (hose bibs or sillcocks). If the faucet is not a frost-proof type, turn off the water to the faucet inside the house and drain the exterior section of the pipe and faucet.
Nothing will put a damper on your day faster than a flooded basement. The costly repairs and bothersome inconvenience associated with basement leaks are guaranteed to disrupt your winter plans. While we typically think of leaks and flooding during times of heavy rain, it’s important to remember that these events can occur year-round.
Basement leaks and flooding are actually quite common during the winter months. There are many reasons as to why a basement may leak. However, all leaks are ultimately caused by an accumulation of moisture. Keep in mind that moisture doesn’t necessarily come from rain. During the winter months, homes can be surrounded by water in its frozen form: snow. A quick thaw can introduce a significant amount of water to the soil around your property. While it is always best to consult a professional to assess your basement’s waterproofing, it is important to understand the basic reasons behind those bothersome basement leaks.
Plus, we’ve put together a list of how to prevent snowmelt flooding to help keep your basement dry.
Reasons Why Your Basement Might Leak
01 Basements Radiate Heat – Melting Snow
While it may be below freezing outside, the temperature in a basement is significantly warmer. Whether a basement is finished or unfinished, it is quite cozy compared to the chilly weather outside. The ground outside your home is cold, frozen, and may be covered in snow, while the temperature inside your basement is warm and toasty. This causes your basement to radiate heat. Basements typically radiate warmth up to 8” outside the basement walls.
This radiant heat entering the ground causes frozen soil and snow to melt, thus creating and accumulating moisture. As we learned earlier, a build-up of moisture is the basic cause of most leaks. As the snow melts around your basement, moisture builds up and is trapped between the frozen soil and your basement walls and floor. When moisture accumulates with nowhere to go. This is where the problems begin.
02 Hydrostatic Pressure
We all know what gravity is; the downward force that weighs things down and keeps them from floating off into the atmosphere. Hydrostatic pressure is the fancy term for the downward pull of gravity. When it comes to a leaky basement, this pressure is a common culprit. As we mentioned in #1, when heat radiated from your basement causes the frozen soil and snow to melt, moisture accumulates and becomes trapped between the ground and your basement walls. Hydrostatic pressure pushes down on that trapped moisture.
As the pressure builds, it can force the moisture through existing cracks and holes in your foundation. Additionally, the pressure can build up so much that it creates new cracks in order to give the moisture somewhere to go. Ultimately, the hydrostatic pressure will force the moisture downward, and into your basement if an alternate route isn’t present.
03 Eaves, Troughs, and Downspouts Draining Too Close to the Home
Properly functioning and installed eaves, troughs, and downspouts are key in keeping leaks at bay. These elements are designed to reroute water away from the home. However, if these features are improperly designed or not maintained, they have the potential to do more harm than good. When properly installed and functioning correctly, these elements pull water away from your home. The further away from your foundation that the water is sent, the less likely you are to have leaks.
However, if these elements are poorly maintained, installed improperly, or missing altogether, water can be deposited too close to your foundation. If excess water accumulates close to your foundation, hydrostatic pressure can cause it to be forced inside, as it has nowhere else to go. Keep your gutters clean, and downspouts draining away from your foundation (a minimum of 4 feet away) to help prevent this cause of basement leakage.
04 The Wrong Type of Soil
The soil surrounding your basement plays a large role when it comes to leaks. The right type of soil and irrigation will help the water drain properly and pull moisture away from your home. However, the wrong type of soil with improper draining can cause moisture to pool and become trapped against the walls of your basement. Certain types of soil, such as clay soil, can actually prevent leaks and flooding by absorbing moisture and expanding, rather than allowing moisture to collect and build up pressure. If the soil surrounding your basement does not drain properly, it is suggested to replace it with clean fill dirt, properly installed, and topped with stone or mulch to prevent erosion.
05 The Slope Surrounding Your Foundation is Off
No matter what type of landscape your home is built on, the soil surrounding your foundation should always slope away from the home. Improper drainage is one of the most common factors in basement leaks. The soil surrounding the foundation of the home should slope down 6 inches in the opposite direction of the home.
While 6 inches of the slope may not seem like much, it guides water away from your foundation, rather than allow it to pool at its base. The further away the water drains, the less likely you are to experience leakage. Make sure there is a clear downward path for water to follow, away from, not towards your foundation.
06 Cracks in Your Basement Wall and Floor
Water most commonly enters basements through cracks in the walls and floor. When moisture accumulates outside between the soil and the walls, the pressure pushes down on that moisture, causing it to look for a way to escape.
As a home settles over time and pressure changes for various reasons, cracks will inevitably occur. If not properly repaired, these existing cracks are a direct route, leading moisture straight into your basement. Water will continue to seep through these cracks in the walls and floors until the pressure is relieved or the cracks are eliminated.
07 Sump Pump Isn’t Working Properly
If you have a basement, you are likely to have a sump pump as well. This pump is designed to collect excess water and pull it away from the home. However, if your sump pump isn’t working properly, water will accumulate and potentially flood your basement. A sump pump is installed by creating a hole in the basement floor (the sump pit). When the pit fills with water, the electric pump is activated, pumping the water away from the area.
Sump pumps can fail for various reasons: improper installation, power failure, lack of maintenance, or frozen/clogged drainage lines. Remember to always make sure your sump pump is working properly.
08 Clogged Drain
Clogged drains can also cause water to back up in your pipes and ultimately overflow into the basement.
Ensure sewer lines within your home are flowing freely. If your drains are free of clogs and draining properly, it will help to eliminate the chances of water backing up into your basement.
09 Leaky Window Wells
While windows allow much-needed light to flow into a basement, they can also allow water to make its way in as well. Windows should be properly sealed and free of cracks. The window wells, the areas around basement windows, should have proper drainage in place, allowing water to flow away from the home, and not pool in the wells. Keep a close eye on these areas, as they are common culprits in basement leaks.
When most people think of snow, they rarely think of flooding. However, snowmelt flooding actually happens more than you would think. Flooding from melting snow can happen any time there is a quick temperature change. Most flood damage during the winter and early spring are caused by melting snow as a result of faulty gutters, cracks in foundations, and improper runoff. We look at how to protect your basement from snowmelt flooding.
What are the Main Problems Snowmelt Causes?
Flooding
Although unlikely, a rapid thaw can result in snow flooding your basement or crawl space. This typically happens is there is a sudden change in temperature. Snowmelt flooding can damage flooring and walls, as well as furniture and personal items.
Water Damage
Similar to flooding, water damage can result if there is water enters your property more slowly. Water damage caused by snow melting typically happens during more gradual thaws but can result in the same amount of damage.
Mold
Anytime there is a persistent source of water, there is a potential for mold. Although mold generally prefers warmer temperatures, it will thrive if the conditions are right. It is most common during slow, gradual thaws, but may develop after water damage or a flood as well.
How to Prevent Snowmelt Flooding
- Shovel snow away from your home, keeping it away from your foundation. Whenever possible, keep snow 5 feet away from your foundation
- If your home is on a grade or hill, shovel snow so that it doesn’t roll toward your home when it melts. This ensures melting snow flows away from your home, instead of towards it.
- Clear snow from your roof to prevent excessive buildups. This prevents a significant amount of water from flowing through your gutters during a thaw.
- Keep drainage areas around your home clear of snow and ice build-up. This ensures melting snow will drain properly and helps prevent backups.
- Inspect basement walls for cracks. This includes caulking around windows too. Make repairs as necessary to prevent water from entering your basement.
- Check your landscaping before the snow arrives to ensure the ground slopes away from your home. Add additional soil if necessary to help melting snow flow away from your foundation.
- Check your roof for ice and snow build-up. This can lead to ice damages that allow melting snow to enter through your roof.
- Inspect your gutters and downspouts. Clear leaves and other debris regularly during the fall, as this can create blockages. Add downspout extensions to channel melting snow away from your home.
- Test your sump pump during the winter to ensure it works properly when the snow melts. Pour a bucket of water into the sump basin to engage the pump. If it doesn’t turn on, unplug the pump and investigate the issue.
- Never ignore water in your basement. Investigate and repair the source as soon as possible.If you have water in your basement or a flood from melting snow, dry and clean the area as quickly as possible.
What to do if Your Basement Floods From Melting Snow
01 Remove the Water
Begin extracting the standing water as soon as possible. This helps limit water damage and improve the chances of salvaging your basement. For deeper water, use a bucket to bail out a flooded basement or a pump to extract water.
For shallow floods, use towels, sheets, or a mop to soak up standing water. Wring out soaked materials in a bucket or other container, then pour down a drain after the flooding has subsided. The faster you remove the water, the less damage it will cause. If you don’t have a pump you can rent one from your local equipment rental company.
Once you’ve gotten the majority of the water out, use a wet-dry shop-style vacuum to deal with the remaining water. This is effective at sucking water from carpeting as well as water damaged walls and ceilings.
02 Remove Damaged Materials
Now that you’ve removed as much water as possible, it’s time to remove water damaged drywall and other materials. It’s best to remove any material that is already cracked, crumbling, or sagging. However, you can likely dry materials that are only damp. If you need to remove water-damaged materials, make clean cuts 2 inches away from the damage.
You should also dispose of water damaged paper and cardboard items, as they are hard to save and likely to allow mold to grow. Use thick plastic bags when disposing of water-damaged materials to prevent leaks and mold growth.
03 Dry Out the Flooded Basement
After removing damaged materials, begin drying your basement as quickly as possible. While consumer fans and dehumidifiers will work, you may consider renting commercial air movers and dehumidifiers to ensure a faster drying time. Monitor the progress and relocate fans regularly for the fastest drying time.
Place fans throughout the area to maximize air movement and keep dehumidifiers running by emptying them frequently. Consumer gear may take a week or more to effectively dry your basement after a snowmelt flood, while professional equipment is likely to take half that time.
04 Sanitize and Deodorize
Once the area is completely dry, use chemical disinfectants and deodorizers to prevent odors and mold from developing in the future. Unfortunately, bleach is only effective at killing mold if the area remains completely dry. A hospital-grade sanitizer is more effective at preventing mold and bacteria in the long term. Spray the affected area with sanitizers and deodorizers at least once before making repairs.
05 Repair and Restore the Area
Before beginning to rebuild the basement, investigate the cause of the flood. Look for cracks in the foundation walls or gags in the seam along the floor and walls. Fill cracks with hydraulic cement or caulk to prevent future issues.
If widespread water leaks along your foundation walls are present, consider a permanent solution. This can include waterproofing foundational walls or installing a sump pump.
Finally, begin to restore the area damaged by melting snow. Depending on the extent of the damage, this may involve anything from painting to completely rebuilding the area.
Get Professional Flooding and Water Damage Restoration
If extensive damage has occurred or you do not wish to undertake the project yourself, let restoration specialists repair the damage.