Prepping Your Garden for Spring
Prepping Your Garden for Spring detail
Spring Gardening Guide
Every Spring, gardeners everywhere begin to break out tools, tend to the soil, and grow seedlings indoors to prepare for spring planting.
There’s a lot to do, and it is easy to become overwhelmed by all the tasks that need to be completed to have a successful growing season.
This guide is here to help. If you’re new to gardening – or if you could simply use a refresher – follow these steps to get your garden ready for planting as soon as spring arrives.
Garden Prep Tips
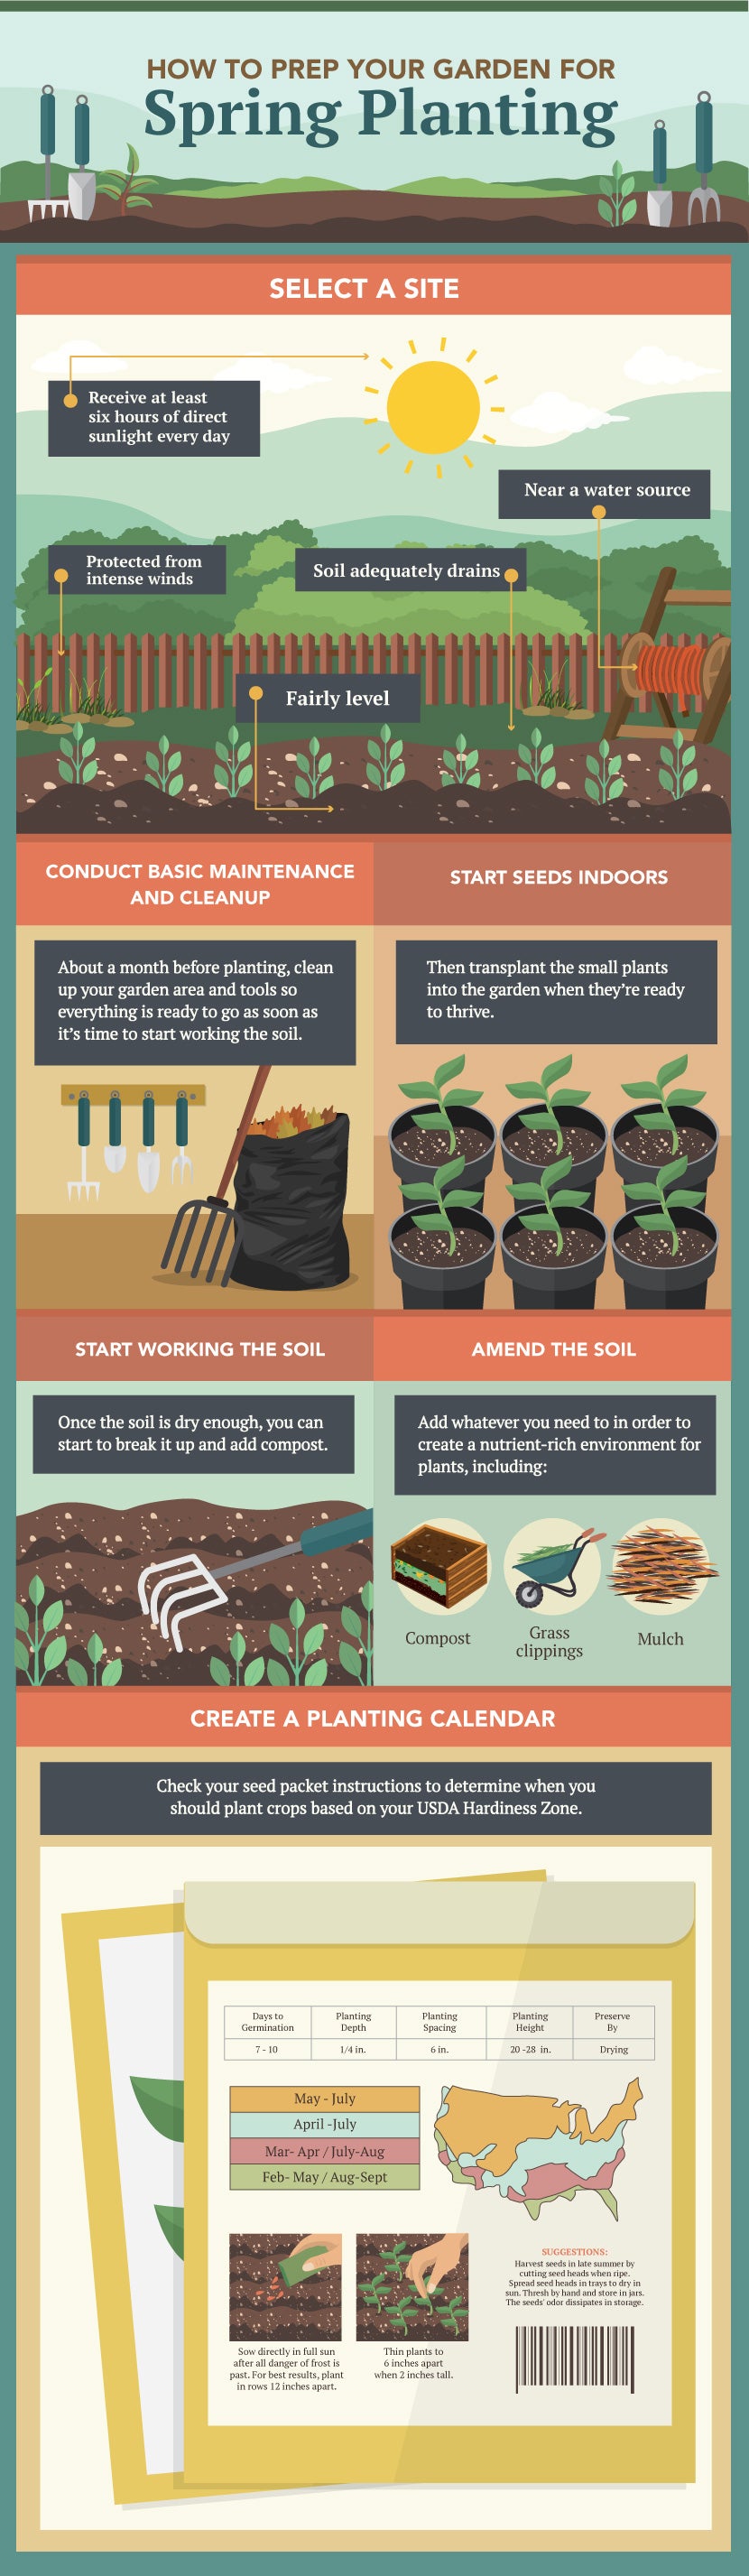
Selecting a Site for a New Garden
If you are starting a new garden, choose an area of land that maximizes your chances of a successful harvest. Choose a location that is fairly level, near a water source, and protected from intense winds. It should also have adequate drainage and receive at least six hours of direct sunlight every day.
Perform Basic Maintenance and Cleanup
About a month prior to planting, clean up your garden area and tools so everything is ready to go as soon as it’s time to start working the soil. Clear out leaves and fallen branches from your flower beds.
If you compost, add the leaves to the compost; if you don’t compost, now’s a great time to start. Fix broken gates and fences while making sure that all of your tools are clean and in working condition.
It’s especially important that tools are clean so that you do not accidentally spread a fungus or insect eggs throughout the garden. Remove any clumps of soil from tools using a hard-bristle brush, hose them down, and dry them off before storing.
Header text
Start Seeds Indoors
Many plants won’t grow well (or at all) if put directly into garden soil. The solution? Start growing the seed indoors in the weeks leading up to spring, and then transplant the small plants into the garden when they’re ready to thrive. Or, you can purchase starter plants from local farmers or greenhouses right before you’re ready to plant.
To start seeds indoors, begin by choosing a container. Small paper cups with holes punched in the bottom, cups made from newspaper, or folded cardboard all make wonderful options since they can be added to the compost when you transplant the seedlings.
Whichever method you choose, make sure the container is around three to four inches deep. It is also helpful to buy or construct a watertight tray to hold all of the containers. This allows seedlings to soak up water from both the top and the bottom; it also helps with not creating a mess every time you water. (Don’t forget to empty any un-absorbed water from the tray after each watering.)
Next, obtain some seed-starting mix. Fill the containers with the mix up to ¼ inch below the top of the containers – the soil should be packed firmly but not overly compacted. Refer to your seed packet instructions to determine how deep to plant the seeds. In general, it’s a good idea to plant two or three seeds in each container; however, if planting large seeds, plant only one in a container.
Once you’ve planted the seeds, you may choose to apply a light layer of sand or vermiculite. Some sources recommend doing so, while others state that it’s not necessary – your best bet is to experiment to determine whether this a step you want to include or not. Then, cover the containers loosely with plastic wrap or clear plastic bags, and keep them covered until they start to germinate.
Also, be sure that the containers are exposed to light by either placing them in an area that receives direct sunlight for several hours a day or by placing them directly under fluorescent lights. Research your specific seeds to determine their light requirements. The location should also be warm – most seeds require daily exposure to temperatures between 65 and 75 degrees (or warmer) in order to properly germinate. If you are worried about the seedlings being warm enough, consider setting a heating pad underneath the tray.
Continue to expose the containers to light after the seedlings have germinated. And do not forget to water them! It is also recommended that you apply compost or organic fertilizer if you’re keeping the seedlings inside for more than three weeks, but to be sure –research the plants you’re using to determine whether this step is necessary.
After the seedlings germinate and the first true leaves appear, repot any seedlings that have become crowded. Keep them exposed to a consistent supply of light until you’re ready to transplant them into the garden. Again, research your plants’ specific needs to determine the amount of light exposure that will work best so that you are setting yourself (and your plants) up for success.
Amend the Soil
“Amending” the soil is just a fancy way of saying “add whatever you need to in order to create a nutrient-rich environment for plants.” While synthetic fertilizer options abound, your soil and the surrounding ecosystem will be much healthier – and stay that way – if you stick with organic fertilizer options. As an added bonus, organic fertilizers tend to be much cheaper than synthetics.
Conducting a soil test before planting will help you discover which nutrients the soil is lacking. That information can help direct you toward an appropriate fertilizer option(s). The best organic fertilizer options are:
Compost: Because it’s incredibly rich in nutrients, compost is a great way to improve soil’s health in every way, from providing crops with the nutrition they need to improving water drainage. Some sources suggest that gardeners apply one inch of compost to the top of the soil, while others advise incorporating a few inches of compost deeper into the soil. You can make your own compost from kitchen and yard scraps or seek out compost from local farmers.
Grass clippings: Similar to compost, grass clippings supply a garden with nutrients. They can also be used like a mulch cover to slow weed growth and improve the soil’s ability to store water. Many communities offer free yard waste compost; check with your local municipality to explore your options. You can also collect grass clippings from neighbors; just be sure not to use grass from lawns that have been treated with herbicides. Mix a half-inch of clippings into the soil or add one to two inches of clippings on the surface.
Mulch: Mulch can be made from a variety of organic matter, including shredded leaves, hay, and grass clippings. Applying one inch (or more) of mulch on top of the soil provides a steady stream of nutrients as the mulch begins to decompose. Many gardeners choose to use mulch in conjunction with compost to create exceptionally healthy soil while helping suppress weeds that compete with their plants.
Start Seeds Indoors
Many plants won’t grow well (or at all) if put directly into garden soil. The solution? Start growing the seed indoors in the weeks leading up to spring, and then transplant the small plants into the garden when they’re ready to thrive. Or, you can purchase starter plants from local farmers or greenhouses right before you’re ready to plant.
To start seeds indoors, begin by choosing a container. Small paper cups with holes punched in the bottom, cups made from newspaper, or folded cardboard all make wonderful options since they can be added to the compost when you transplant the seedlings.
Whichever method you choose, make sure the container is around three to four inches deep. It is also helpful to buy or construct a watertight tray to hold all of the containers. This allows seedlings to soak up water from both the top and the bottom; it also helps with not creating a mess every time you water. (Don’t forget to empty any un-absorbed water from the tray after each watering.)
Next, obtain some seed-starting mix. Fill the containers with the mix up to ¼ inch below the top of the containers – the soil should be packed firmly but not overly compacted. Refer to your seed packet instructions to determine how deep to plant the seeds. In general, it’s a good idea to plant two or three seeds in each container; however, if planting large seeds, plant only one in a container.
Once you’ve planted the seeds, you may choose to apply a light layer of sand or vermiculite. Some sources recommend doing so, while others state that it’s not necessary – your best bet is to experiment to determine whether this a step you want to include or not. Then, cover the containers loosely with plastic wrap or clear plastic bags, and keep them covered until they start to germinate.
Also, be sure that the containers are exposed to light by either placing them in an area that receives direct sunlight for several hours a day or by placing them directly under fluorescent lights. Research your specific seeds to determine their light requirements. The location should also be warm – most seeds require daily exposure to temperatures between 65 and 75 degrees (or warmer) in order to properly germinate. If you are worried about the seedlings being warm enough, consider setting a heating pad underneath the tray.
Continue to expose the containers to light after the seedlings have germinated. And do not forget to water them! It is also recommended that you apply compost or organic fertilizer you’re keeping the seedlings inside for more than three weeks, but to be sure –research the plants you’re using to determine whether this step is necessary.
After the seedlings germinate and the first true leaves appear, repot any seedlings that have become crowded. Keep them exposed to a consistent supply of light until you’re ready to transplant them into the garden. Again, research your plants’ specific needs to determine the amount of light exposure that will work best so that you are setting yourself (and your plants) up for success.
Create a Planting Calendar
Regardless of whether you are starting seedlings indoors or purchasing small plants to transplant into your garden, it’s important to plant them at the right time. Cool-season crops – which include broccoli, Brussels sprouts, cabbage, cauliflower, lettuce, and onions – can be planted early in the season. Warm-season crops – which include eggplant, peppers, and tomatoes – should be planted only after there’s no risk of frost (typically toward the end of May beginning of April in our area).
When transplanting crops, it’s important to “harden off” any seedlings that were started indoors before planting them in the garden. Do this by setting them outside in the shade for an hour or two for the first couple of days, and then gradually increasing their time outside over the course of a week. That way, when it is time to transplant them into the garden, they should be hardy enough to survive the outdoors.
No matter what you plant, remember to rotate your crops’ placement to avoid planting the same items in the same place each year. A failure to rotate crops can result in a higher incidence of pests, diseases, and can deplete the soil over time. Creating a written record of what you’ve planted and where can be of help here. By keeping a written record, you can compare your garden’s successes and challenges as years go by.
It may seem like a lot, but investing some time in late-winter garden prep helps ensure your garden can provide a healthy home for your crops come spring. The payoff is worth it – both your wallet, your health, and your environment will benefit from growing organic produce at home.